This blog explains a very simple ALB setup which forwards request to a ec2 server which has a tomcat application. ALB serves HTTPS request where as tomcat has only HTTP enabled.
Please follow these steps to configure this :
Step 1 : Create a ec2 instance
- Login to AWS management console and select EC2 service
- Click Launch Instance and select the Amazon Linux AMI that has Java as part of the Linux AMI. In the below screenshot, the second AMI has Java included in the Linux image.

- Select t2.micro for Instance type and make sure “Default VPC” is selected in Instance Details page.
- Storage can be default value.
- In Security Group page, add inbound rules for both SSH (port 22) and HTTP (port 8080) to allow tomcat server requests.

- Review and Launch the instance either with an existing key pair or a new key pair that will be used for SSH.
Step 2 : Install tomcat
- SSH to the instance that got created in the previous step. If you are using a Linux terminal to SSH, use this command “ssh -i <keypair.pem file> ec2-user@<ec2 public IP>”
- Once you are in ec2 server, execute “sudo yum install tomcat7 tomcat7-webapps -y” to install tomcat7
- If the installation is successful, you should see Tomcat7 in /usr/share/tomcat7 path
- Start the Tomcat server using sudo service tomcat7 start
- If there are no errors, you should be able to access the tomcat server using http://<ec2 public IP>:8080 and see this page

Step 3 : Configure ALB
- Next step is to configure ALB and enable HTTPS for Tomcat
- Select “Load Balancers” in ec2 service
- Select “Create Load Balancer” and create “Application Load Balancer”
- Name it as TomcatALB, select “Internet-facing” and change the protocol to HTTPS

- Select “Availability Zones” in the “Default VPC”. At least two AZs must be selected to proceed.
- Since this ALB is serving HTTPS traffic, a certificate needs to be configured in the “Security Settings” page. It won’t allow you to proceed with next step without configuring a certificate.
- You need a private key and certificate body to create a new certificate. For the purpose of this blog, let’s create a self-signed certificate. In reality, it will be a certificate from Trusted CA.
- You need openssl to generate this self-signed cert. From command prompt, execute “openssl genrsa 2048 > alb-private.key” to generate a private key.
- Execute “openssl req -new -x509 -nodes -sha1 -days 3650 -extensions v3_ca -key alb-private.key > alb-public.crt” to generate the certificate. You can specify default values for the certificate attributes. I used *.example.com for the Common Name.
- Copy the contents of “alb-private.key” and paste it in “Private Key” text box . Similarly, copy “alb-public.crt” contents and paste it in “Certificate body” text box.
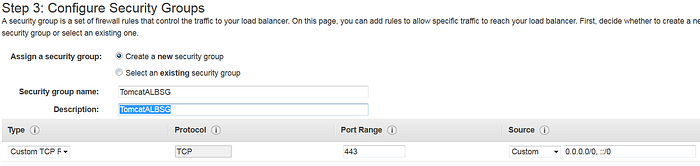
- Go to “Security Groups” page and create a new security group called “TomcatALBSG”
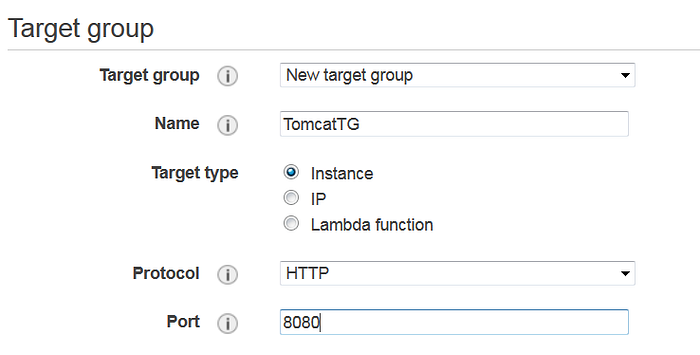
- In “Routing” page, select “New target group” and name it as TomcatTG. Change the Port to 8080 since tomcat listens in this port.
- In “Register Targets” page, select the instance where tomcat is deployed and add click “Add to registered”.
- “Review” and confirm to create the new ALB
- Go to “Target Groups” screen in ec2 service and check if the newly created TomcatTG is showing up. Select this Target Group and make sure the instances are showing as healthy. Sometimes it will take long time to show up as healthy. Please keep refreshing and wait until it turns healthy.
- Go back to “Load Balancers” screen and select the newly created “TomcatALB”.
- Copy the DNS Name and type “https://<ALB DNS Name>” in the browser. You should see the same tomcat home page that was returned for this URL http://<ec2 public IP>:8080.
- Sometimes ALB will take long time to start responding to requests. Please wait for few minutes and keep refreshing the page every 4–5 minutes.
With this setup, we added a HTTPS layer on top of a tomcat instance without making any changes in tomcat server configuration. In reality, application ec2 instance will not be deployed in public subnet. Ideally, it will reside in a private subnet. You can do few additional steps to restrict access to tomcat through 8080 port.
Step 4 : Additional Steps
- With this setup, tomcat is available through “https://<ALB DNS Name>” and “http://<ec2 public IP>:8080”
- We can restrict user access to tomcat only via ALB and block access to direct ec2 by changing the ec2 security group “TomcatSG”.
- In order to do that, get the security group ID of ALB security group TomcatALBSG
- In “TomcatSG” security group, remove all the inbound rules for port 8080. Add a new “Custom TCP” inbound rule for port 8080 and change the source to “TomcatALBSG” security group ID. Generally it will be something like sg-23409234wer234234.
- Save the changes and try accessing http://<ec2 public IP>:8080. Now, it should timeout because we removed the 8080 port access for all public IPs.
- Try accessing https://<ALB DNS Name> and it will work.
- If you want to confirm this behavior, you can again add 8080 inbound rule in TomcatSG for all IPs, save and access http://<ec2 public IP>:8080. Later on, remove and again test.

Step 5 : Cleanup
- You can delete all the resources so that you don’t get charged more
- From EC2 dashboard, go to Load Balancers and delete TomcatALB
- Go to Target Groups and delete TomcatTG
- Go to Instaces and terminate the ec2 instance
- If you want to delete the self-signed cert, you can go to “Certificate Manager” service and you should see the below self-signed cert. You can delete that certificate

Thanks for reading this blog. If you have any questions / suggestions, kindly leave a comment.
